As you have learned from my prior blog posts, Dad has been making some strange purchases and working on a secret project. Well, my Christmas wishes have come true! I've got my UTV!
There are many
great things to do you when we visit the desert in Quartzsite each year. But there is one fun thing we could not do because we lacked the equipment. That is ATVing or
off-roading on the hundreds of trails that exist around us.
For several seasons, we have been watching all these folks roam around the desert
on their quads, UTVs, ATVs, Jeeps and even dirt bikes, wondering why do we have
to miss out on all this fun?
Well, this past Spring, Mom gave dad a challenge. She said
find a way to carry an ATV or UTV within the confines of our current set up and we will get one! She even allocated him the bucks to do
it!
Neither Dad nor I could believe what we heard, but within
seconds of Mom’s momentous words, I could see smoke rising, evidence that
the wheels were turning inside of Dad’s shiny bald head!
How was he going to pull this one off? Had Mom set him up? Was
this some cruel joke she has employed to watch Dad go crazy trying to figure out
this complex problem? Did she suffer from temporary insanity? No, she was dead serious about this and
wanted to light a fire under Dad’s butt.
I have a funny feeling she knew
all along that the evil genius I know as Dad could figure it out!
Well now that you understand the challenge, I am going to
let Dad take over to finish the story since he has all the technical info and I
can get back to munching on more cheese!
********************
Thanks, PoPo. Your intro to the challenge set the tone, now
let me explain the parameters and how I set out to achieve it!
Here are the parameters:
- The Budget
- How are we going to transport whatever Off Road Vehicle (ORV) we decide to get?
- What type of ORV to get?
- Limiting factors for ORV (weight, size, cost, street legal?)
- Usability of ORV (trails, paved roads, etc.)
- Ease of operation of both ORV and/or loading system
I had to figure out was what, if any, ATV, UTV
or some form of ORV could we possibly carry with us.
There are so many manufacturers and types, it was going to
take some time just to narrow it down. But first things first: where are we
going to carry this thing? We already have our garage in Big Boomer filled with
our motorcycles, tools, miscellaneous equipment, etc. There is also not enough room to put something behind the garage/in front of the hitch (we already
have a storage box residing behind the garage and adding anything would
impact the turning radius of the 5th wheel when we are traveling.) Towing a trailer behind the 5th
wheel (which also has a storage box attached to it) would make us super long
and unsafe, not to mention it is illegal to double tow in many states.
 |
Big Boomer! Little does he know that he about to be transformed once again!
|
So what alternatives do we have? For a brief moment I
envisioned somehow placing the ORV in the garage above the
motorcycles. But there was not much room and that would severely limit our
options on what type of vehicle to get. So the next idea? GO VERTICAL!
Ok, so thinking about this, how would I get an ATV or UTV on
top of Boomer? Would I need to build a new frame and ramp system over the top
of the cab like some of our friends have on their pick-up or medium duty trucks? Is that even
possible?
One thing I did not want to do is chew up a good chunk of
the budget that our family CFO set with a complicated ramp and framing system. Anyway, where would we carry/store that equipment and could we handle the added weight?
Will my lovely and talented wife, who through my tutelage is
becoming a Mini MacGyver, be able to set-up and operate whatever I come up with
to use the ORV? Even if I were to build a new frame and ramp system, I did
not want to carry too much weight on the top. I wanted to keep whatever we decided to
buy light and easy to maneuver. Plus whether I put the new ORV over the cab or
on top of the garage, we have height limitations. Although there are no Federal
regulations regarding highway height restrictions on the National Network, the
general rule is to keep it between 13’-6” and 14’-0”. The actual Federal
Interstate construction guidelines as administered by the Federal Highway
Administration state a minimum vertical clearance in rural areas of 16’-0” and
14’-0” in urban areas, with allowances for extra layers of pavement. This
includes signage and pedestrian bridges which must be at least 1 foot above all other
structures. State highways generally follow Federal guidelines.
https://safety.fhwa.dot.gov/geometric/pubs/mitigationstrategies/chapter3/3_verticalclearance.cfm
We all know
there are obvious exceptions. Over the cab, if I build a new steel framing
system, I could possibly have 5 feet above the cab to work with. Over the garage
which is 9’-5” from the ground, I am limited to 4’-1”. Since all Interstate
highway bridges should meet or exceed 13’-6”, my real concern is on normal, everyday local and state roads where the minimum 13’-6” for overhead clearances
may have been grandfathered. Regardless of how it turns out, there will now
always be extra planning on our part for the roads we take on the trips we
make.
So now that my mind was wrapped around somehow carrying the
new ORV on top of Big Boomer (more to come on how we will get the ORV on top), what type and by which manufacturer?
Many of the ATVs and side x sides, regardless of the
manufacturer, tend to be rather large and heavy.
I quickly eliminated single ATVs or quads because there is
not enough room for two on top. Looking at two-up ATVs, the problem begins
with size and weight. Most which are capable of carrying both of us usually
start at 750-800 lbs., plus they end up being about 50+ inches in
height at their highest point. Not good if you need to keep it under 48 inches.
I started looking at side x sides, both sport and utility.
Again a lot tend to be heavy, 1,100 lbs. and up, and they start
running at a height of 60 inches or more. I really did not want to put 1,100+ lbs. on the roof of Big Boomer and make him top heavy. Now in addition to the weight of the actual UTV, in order to carry this weight we would have to build a framing system and ramp system over the cab. I roughly calculated that this would add another 1000+ lbs in the front of the truck. This would necessitate upgrading the front axle on Big Boomer to accommodate the extra weight. So as you see the problem becomes exponentially more difficult and cost prohibitive as you move up in class in the UTV world.
So next on the list are what are considered mini-side x
sides both in sport and utility versions (think Polaris RZR 170). Although
these tend to be more in line with what kids would use, this market is ever
expanding and is becoming more and more popular for adults. There are several names on
the market, many actually either built or owned by the same parent company. As
mentioned, Polaris is one of them, the others being Hisun Strike and Sector 250
www.hisunmotors.com, Massimo Gunner
250 and 250S www.massimomotors.com and Bennche Cowboy and Spire 250 www.bennche.com . There are about another
half dozen, but they were eliminated either because they were only available
online with no dealer network or they were extremely undersized and not street legal.
 |
The Polaris RZR 170
|
 |
Side view of Massimo/ Bennche Cowboy 250
|
 |
Rear View of the Cowboy 250
|
 |
The Massimo/ Bennche Cowboy 250
|
All of the models from which to choose weigh in between 600 and 700 lbs.
They all have a 16 HP 250CC engine (except the Polaris which has a 13 HP 170 CC
engine.) Massimo and Bennche are the same company, but are owned by Hisun. The
Hisun, Massimo and Bennche units all come with roofs, windshields, turn
signals, mirrors and a 2,500 lb. winch. These are all additional options for
the Polaris. All of them also have removable roll cages which would allow us to
get under the legal height requirement. With the roll cage off, the actual
height to the highest point on the unit would be 42 inches. This gave me 6 inches to spare, and once the unit is strapped down you can get another 4-6 inches lower with
the shock travel on the axles.
Both the Massimo and Bennche models are built in our Great Home
State of Texas. They are street legal
and can be registered and titled as such.
After visiting several dealers to see the various models, we
quickly ruled out the sport models, Polaris RZR, Gunner 250s, Strike 250 and
Spire 250 simply because I could barely get in them--we would need a pry bar to
get me out. Also the Gunner, Strike, and Spire are Polaris clones, so they are
all pretty much the same unit as far as specs go.
We now focused on either the Sector, Gunner or Cowboy 250. These have bench seats which allow us to sit comfortably and provide easy access in and out. Since the Hisun Sector is not street legal in Texas, I eliminated that model as an option. Finally I found a dealer in Conroe,
Texas (within 1.5 hours of our homebase in Livingston) who offers the Bennche
Cowboy 250 that fit nicely within our parameters of budget, height, weight.
Now that I narrowed down the unit, it was time to get down and dirty to figure out how the heck we are going to carry this thing
around with us. Again, building a ramp system and trying to store those
components was not making any sense. My Mini MacGyver asked one
evening while I was doing some internet trolling for info “is there any way you
can lift it onto the truck like we do the motorcycles?” Hmmmm……this now sent me
down a different path of investigation:
a truck utility crane like the ones you see on service trucks. During
this research I found that these truck cranes, although reasonable in price,
where actually quite cumbersome and heavy, most weighing in around 400 lbs. Now
we are talking adding another 400 lbs. onto Boomer’s roof. Plus these cranes only
fold down so much, and most would leave me above the legal height we need to
stay under.
 |
Typical Truck Crane Mounted on Service Truck.
|
Low and behold, one night while searching the internet, I
stumbled across a company called Spitzlift in California that designs and manufactures lightweight portable aluminum cranes. Spitzlift looked like it may have solved all of
our problems. At their website, www.spitzlift.com
, I found that they had multiple set-ups for their cranes. These cranes could
be side mounted, service body mounted, flat bed mounted, or van mounted. The
actual crane itself weighs in at 40 lbs., has an ultimate lifting capacity of
900 lbs., and is 12V DC powered. Eureka!
 |
The Spitzlift Crane!
|
After looking at their videos and pictures and seeing that
they had a flatbed mounted assembly, I figured it was worth a shot to see if we
could make this work on Boomer’s roof. I gave them a call and spoke with their
engineers, Emilio Munoz and Michael Spitzlift. They heard what I was looking to
do, and they certainly seemed both eager and confident that they could make it
work.
It was off to the drawing board to figure how to tie this
crane into Boomer’s garage structure to lift a 600-700 lb. UTV onto the
roof. I sketched up a scenario where Spitzlift would make a custom base
plate along with a custom mount backing plate which would sandwich the 2” x
2” steel roof structure.
 |
My initial sketch of the corner construction and adaptation of the
truck garage box for the Spitzlift Crane as worked through the details.
|
 |
Here is the final design sketch of the mounting plates.
|
Once they took a look at the sketch, they provided me
a quote in a day. The entire cost of the crane and customization of the plates
was already much less than what I was figuring for a custom built ramping system, significantly less cumbersome and a mere fraction of the weight. As you will see in the pictures the crane is only 48 inches long when folded up and stored.
So after reviewing all the fine print and doing another once
over of the design, I cut them loose with the fabrication of the custom plates.
They estimated it would take 4-6 weeks to complete the task. To my surprise,
they completed the plates in 2 weeks and shipped them out. The crane package
was shipped separately and arrived another week later. The UPS guy at this
point must be wondering what the heck is all this stuff arriving and what are
we doing with it?
Throughout the process, Emilio and/or Sean (who was in
charge of the detailing of the custom plates) were staying in contact and
providing updates on the progress. After
shipment, they followed up to see if all was going well with the install.
Outstanding customer service to say the least!
The actual install of the crane and its components took a
total of 3 days over two weekends. Most of the work was drilling out the 12 –
9/16” holes through the roof and main structural steel. I had to modify the
underside mounting plate to fit around the structure in the garage which was
expected, and also had to add and modify steel tubing to support the
outer perimeters of the mounting and base plates. Spitzlift provided the additional
tubes I needed, which made it easier than trying to source them out
while we sat in the Grand Canyon.
 |
This is the actual corner construction of the garage. This is where the crane
will sit above once the anchor/ base plates are bolted into place.
|
 |
This is the additional 2" x 2" x 3/16" steel tubing that I will install to create the outer edge of the frame that the base plates will sandwich and be bolted through. Note the line of the notch that I will cut so the tube sits tight against the 1" x 1" x 1/8" steel cross tube on the roof.
|
 |
Here is the 2" x 2" tube installed. I used 1 1/2" x 1 1/2" x 3/16" steel angles anchored into the existing structure and the new tube (see arrows). Although in speaking with Spitzlift, we could have used their standard anchor construction to support the crane, I wanted to insure good structural support. To do so I had them customize their standard 10" x 10" plates into a 19" x 19" plate to capture the garage structure.
|
 |
Another picture of the new horizontal tube showing the clip anchors. Note the notch in the tube so it sits under the 1" x 1" tubing. This will add to the structural support of the plates and assist in equally transferring loads throughout the garage structure.
|
 |
| Here is the underside anchor plate which I will use as a template to cut the hole in the roof base plate/crane support tube pass through. The 12 - 9/16" are for the 1/2" grade 5 anchor bolts which will connect the two plates together. |
 |
Tracing the opening for the cut on the roof.
|
 |
Drilling the corners out to match up with the tube layout. This will help when I cut the entire hole out with a grinder.
|
 |
This is a foil pan that will help keep the sparks when I am cutting the roof with the grinder from entering the garage and damaging anything inside.
|
 |
Here is the foil box taped up to the underside of the roof to prevent sparks from entering the garage.
|
 |
Using a 4 1/2" grinder to cut the hole in the roof. Don't forget the PPE (Gloves, safety glasses) to protect from injury.
|
 |
Hole complete for the base tube extension, now the fun will begin.
Notice the scrap piece of roof dropped nicely into the spark catcher!
|
 |
This is the crane base plate with the extension tube for the crane mast. As you can see, Spitzlift did an amazing job of fabrication, prep and paint. The tube will extend into the garage as designed.
|
 |
As a precaution, I placed some Dicor sealant around the hole in case there is any leakage around the perimeter seals. We do not want any water entering the "Man Cave"!
|
 |
After spending the better part of 4 hours drilling the 12 - 9/16" holes through the 1/8" steel roof and the 1/4" thick steel tubes, the plates are ready to be bolted down. Spitzlift supplied the 1/2" grade 5 bolts to completed the anchoring.
|
 |
Here is the interior plate which sandwiches the steel garage tubing with bolts in place. To make sure the loads are evenly distributed, I placed 1" steel tube spacers between the roof tubing and the plate. After torquing the bolts up time to move on to the next step!
|
 |
The plate is all sealed up with Dicor sealant. In order to prevent water from entering the extension tube hole I purchased a typical rubber trailer hitch insert. It fits snug and is easily removed during operations.
|
 |
Plug inserted.
|
After getting the entire crane up and running, it was time to
load test. So if there were issues, I could resolve them
now before moving forward with any other work. Since I did not have the UTV yet, I decided
to use my Harley Road King Classic for testing the crane’s lifting abilities. The Road
King weighs approximately 850 lbs. So if
the crane could lift that, then a 600 lb. UTV would be a cinch.
After strapping it up, the moment of truth arrived and I
pushed the button on the remote. SUCCESS! The crane lifted the bike with no
issues or strain. What an awesome sight that was, and now I could focus on how I
was going to secure the UTV on the roof as we travel.
I knew I wanted to use E-Track to secure the UTV down, but
also wanted to spread the load of the unit across the roof to the main
structure. To do this, I had to find something relatively short in height
but strong enough to take a load and have sufficient material with which to anchor the E-Track down.
I chose to use 2” x 6” x 1/8” (10 GA) steel tubes which will
span the main roof structure and transfer the load of the UTV down through the
garage to the main floor. The main internal welded skeletal frame of the garage
is 2” x 2” x ¼” steel tubing with 1” x 1” x 1/8” steel tubing laced on the roof
and all sides. All of the outer skin on the garage is 10 gauge steel.
I found the tubes I wanted at a “local” (2 ½ hour trip)
steel supplier, Yavapai Steel in Dewey, AZ www.yavapaisteel.com, which is just outside Prescott Valley
and Jerome. Both these places were somewhere we wanted to visit, so we combined
a day out with getting the steel we required to make a landing platform on the
roof of Boomer!
 |
The tie down chocks are laid out and aligned. Time for prep!
|
 |
Tubes and E-Track are prepped and time for the primer. I chose Rust-O-Leum HD Primer.
|
 |
For the final finish top coats I chose Rust-O-Leum HD Performance
White to match with the exposed areas of the truck.
|
 |
Using the tubes as templates I laid out the holes that needed to be drilled into the roof and through the garage structure.
|
 |
After drilling the holes in the roof I started to insert the through bolts.
|
 |
In order to facilitate the tightening of the bolts, I employed a
set of vise grips and a box wrench from inside the garage.
|
 |
After tightening all of the bolts, I sealed each head with Dicor.
|
 |
With the tubes in place it was time to fasten down the chocks and seal the heads as well with Dicor!
|
 |
Placing the final seals around the perimeters of all the major components and also sealing the access holes on the tube to prevent any water inside the tubes.
|
A couple of things were now passing around inside my mind.
How am I going to constantly get up and down off the roof with just a ladder
and what happens when it gets wet? I know the answer to the second problem. The
roof gets slicker than cow dung on a wet kitchen floor, so I decided to cover
all of the exposed surfaces with an anti-slip coating. The first question was
not as easy. I did think about adding an RV type ladder to the back of Boomer
but did not like the general appearance of how that would look. So a little
internet search on Amazon.com and what did I find? A removable pontoon boat
ladder. Perfect! It will support up to 300 lbs., is lightweight (7 lbs.) and is
easily installed and removed in a matter of seconds.
I am very pleased with the final outcome of the entire
project, from the crane to the roof platform.
 |
The completed roof with the Spitzlift Crane in place. Now we are ready to go get the UTV and give it a ride home!
|
Now the real test is upon us, acceptance of the UTV that we
have now purchased. The owner of Play-N-Around Motorsports, www.playnaroundmotorsports.com
in Conroe, Texas is an old custom
hot-rodder, so he certainly appreciated our will to be able to add another toy
to our arsenal.
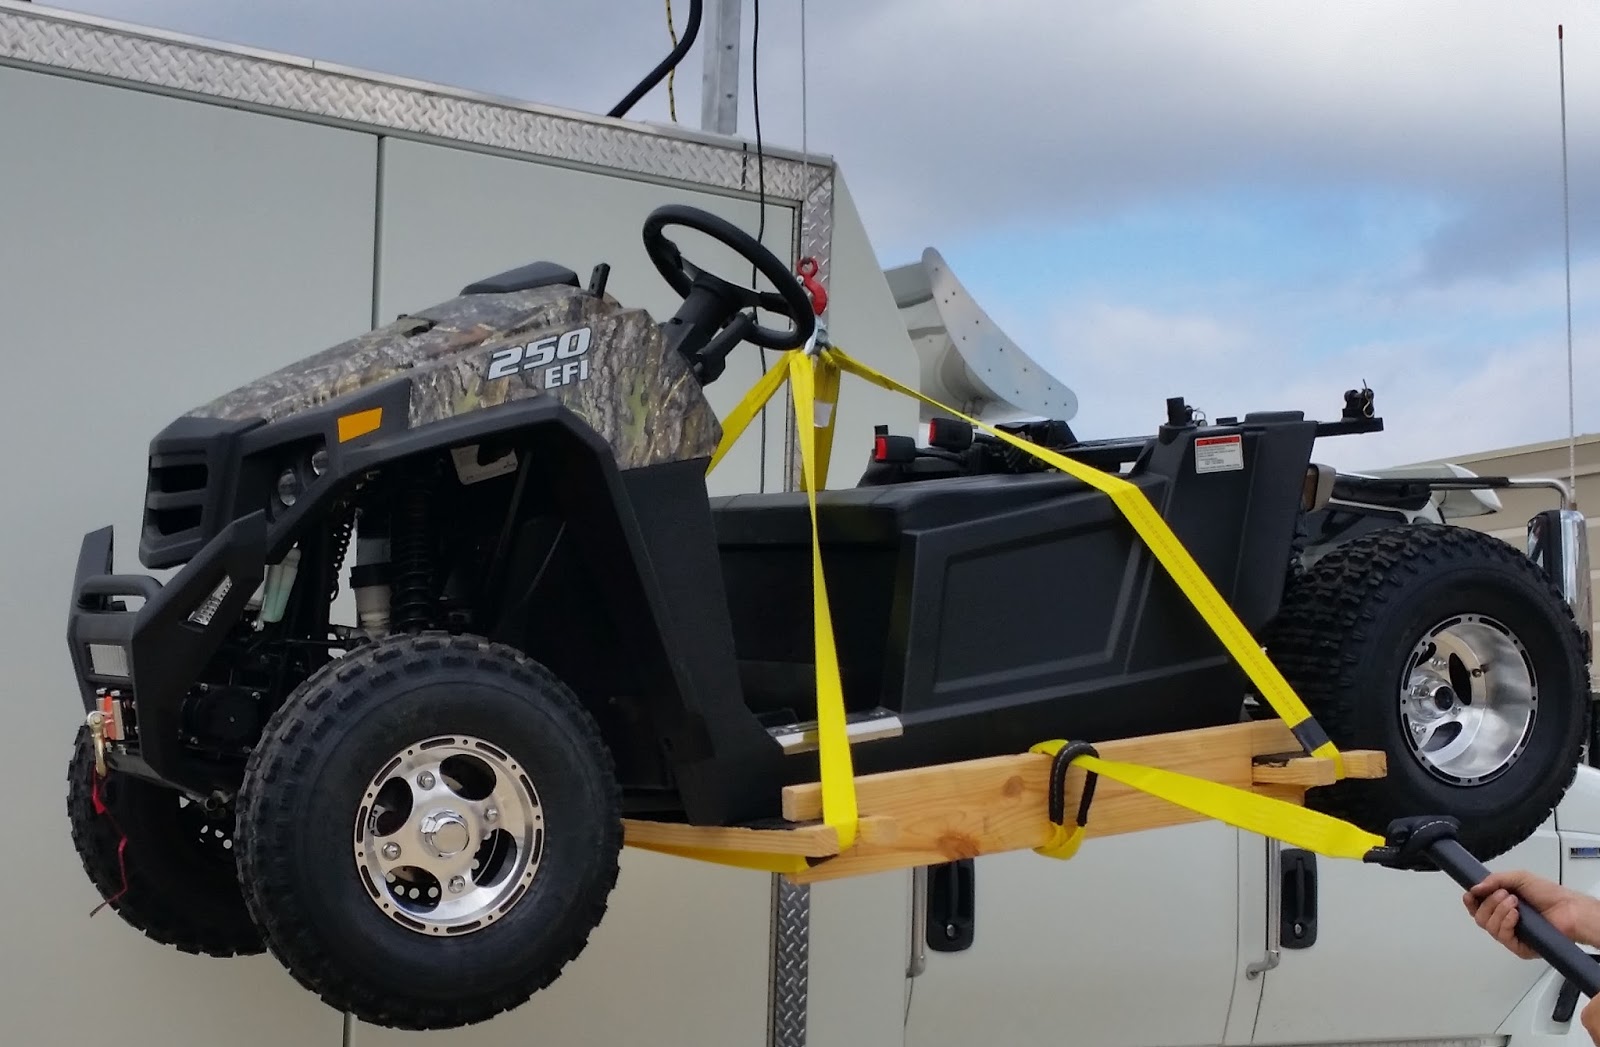
The next big question was how would I pick the UTV up with the
crane? I knew I would have to use lifting slings, but where was I going to place
them? I also knew that I would take the roll cage and utility dump off to lighten the load. I thought about somehow chocking straps on the
cage frame, but I did not feel comfortable with that option.
Lifting the unit from the bottom is the same way the factory
and dealer take them on and off the manufacturing line and transport trailers,
so it was a no brainer in the end. Securing on the roof with the E-Track and
E-Chock system allows for a positive anchorage with both front to back and side
to side anchor points.
 |
UTV is on top of Big Boomer and now securing the tire and tie down straps.
|
 |
Securing the tie down straps!
|
All of the miscellaneous items such as the e-track, chocks,
ladder, etc. were purchased online at Amazon.com.
The miscellaneous hardware such as bolts, etc. were
purchased at Valle Hardware in Valle, AZ, which is great little hardware store
like the old days, located about 25 minutes outside Grand Canyon Village.
And, by the way, even though there was flexibility, I stayed within our family bean counter’s original budget, a major feat! In fact the budget ended up being the easiest part. The most difficult task was overcoming the height and weight concerns.
PoPo is working on a video of the whole lifting operation so stay tuned for the announcement on his YouTube Channel!
*********************
Thanks, Dad. I know
Mom and I are looking forward to some fun in the sun in the desert. Can’t wait to see y’all on the trails out
there!
We would like to thank some amazing organizations for all they do for the RVing community: